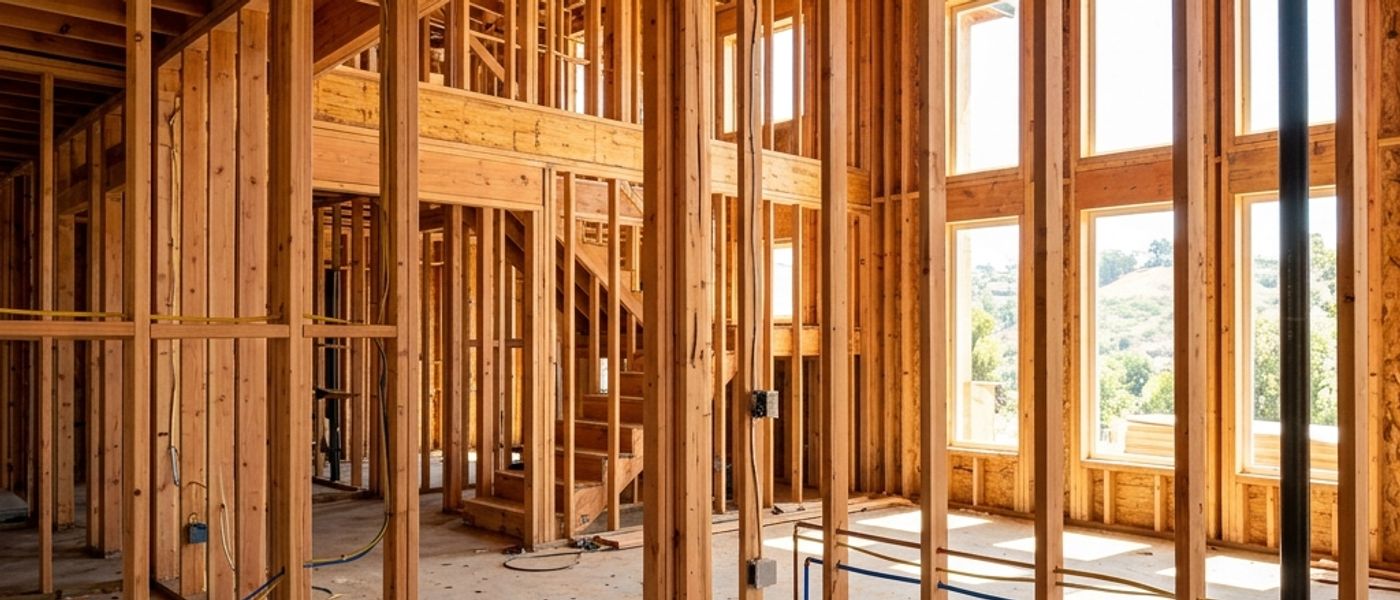
There is a single day during a major remodel when you can see everything that will be hidden for the next 50 years.
Every wire. Every pipe. Every structural connection. Every piece of blocking behind the walls. Every duct run. Every drain line. It is all right there, visible, touchable, verifiable.
Then the drywall goes up. And everything behind it becomes an article of faith.
That day, the pre-drywall walkthrough, is the highest-leverage quality checkpoint in the entire construction process. It is also the one most builders rush past, or skip entirely. Understanding what happens during this walkthrough, and what gets missed when it does not happen, is one of the most valuable things you can know before you hire a contractor for a major Peninsula remodel.
Table of Contents
- The Day You Can See Inside Your Walls
- What Actually Happens During a Pre-Drywall Walkthrough
- Why Most Builders Skip It
- What to Look For: A Homeowner's Pre-Drywall Checklist
- Why Architects and Designers Should Require It
- What Happens If You Skip It
- One Question That Tells You Everything
- FAQ: Pre-Drywall Walkthroughs on Peninsula Remodels
The Day You Can See Inside Your Walls
Picture the scene. The framing is up. Rough electrical is in: wires running through studs, outlet boxes nailed to framing, switch locations marked. Plumbing supply and drain lines are routed. HVAC ductwork snakes through the floor joists and wall cavities. Insulation is staged but not yet installed.
The house is a skeleton. And for this brief window, everything structural and mechanical is visible.
Most homeowners never experience this stage in a meaningful way. They visit the job site, look at the studs and wires, feel overwhelmed, and say something like "looks great!" before heading back to their car. It does not look great. It looks like controlled chaos, unless someone walks you through it and translates what you are seeing.
That is the whole point.
A pre-drywall walkthrough is when the builder stops the project and walks the homeowner through every room, every wall, every system, explaining what is there, why it is there, and asking one critical question at every turn: Is this what you want? Because after today, changing it costs ten times what it costs right now.
Matt Tabel calls it "last call for wires in the walls." It is the moment where the homeowner gets to verify, question, and catch anything before it becomes permanent. On projects in Hillsborough, Atherton, Menlo Park, and Los Altos Hills, where $700+ per square foot is being invested and the home will stand for another generation, this is not a courtesy. It is a responsibility.
For architects and designers, this is the parallel opportunity: the chance to verify that what was drawn is what was built. To check field conditions against design intent. To catch deviations before they are buried.
What Actually Happens During a Pre-Drywall Walkthrough
A thorough walkthrough takes two to four hours. The builder walks the homeowner, and the architect or designer, if one is involved, through every room at the framing stage. Here is what gets covered.
Electrical
Outlet placement. Switch locations. Lighting fixture positions. Dedicated circuits for appliances. The builder points to each one and asks: "Is this where you want it?"
That sounds simple. But consider: Is the outlet behind the kitchen island where your mixer will reach? Is the switch for the pantry light where your hand naturally falls when you walk in carrying groceries? Is there a dedicated circuit for the wine fridge, or is it sharing with the dishwasher?
These are the decisions that determine whether your home works for you every day, or annoys you every day. Right now, moving an outlet costs an electrician 20 minutes and a few feet of wire. After drywall? It costs cutting open the wall, patching, texturing, and repainting an entire surface. On a Peninsula remodel, that repair runs $500 to $2,000 per location.
Plumbing
Supply and drain locations for every fixture, verified against the actual fixture selections, not just the plan. Shower valve placement confirmed at the right height for the people who will use it. Hose bibb locations checked for where you will actually connect a garden hose, not just where the plan showed one.
Structural
Framing layout visible and verifiable. Header sizes above windows and doors. Shear wall placement per the engineer's specifications. Structural engineering details, hold-downs, metal connectors, Simpson ties, visible and inspectable. This is the last time anyone will see these connections until the next remodel, 30 years from now.
HVAC
Ductwork routing through the framing. Register locations in each room, where the warm or cool air will actually enter the space. Return air placement. These details affect comfort and noise for the life of the system. An HVAC register aimed directly at your bed means a cold draft every night. A return air grille next to the primary bedroom means you hear the system cycle on and off. These are layout decisions, and this is the last chance to change them.
Blocking and Backing
This is the element most homeowners do not know to ask about, and one of the most valuable parts of the walkthrough.
Blocking is wood installed behind the drywall, invisible once the walls are closed, that provides a solid mounting surface for heavy items.
Where will the 85-inch TV go? There should be blocking there. Floating shelves in the office? Blocking. Towel bars in the bathroom? Blocking. Grab bars by the shower, even if you do not need them now? Blocking. A heavy mirror over the vanity? Blocking.
Adding blocking right now costs about $15 in lumber and five minutes of a carpenter's time. Adding it after drywall means cutting the wall open, installing the blocking, patching, and repainting. That is $500 to $2,000 per location on the Peninsula, plus the disruption and the weeks of waiting for the patch to cure before painting.
The Spatial Experience
Here is something no drawing or 3D model can replicate: standing in the actual framed space and feeling it.
Your builder should have you walk into the framed shower and stand there. Does it feel right? Step into the closet. Walk the kitchen triangle from sink to stove to refrigerator. Stand where the dining table will go and look toward the living room. Sit on a stool at island height.
This is the first time the homeowner experiences the design in three dimensions, not as lines on a page, but as a space their body occupies. It is remarkable how often this act reveals something the plans missed. A shower that looked generous on paper feels tight in person. A window placement that seemed fine on the elevation creates a sightline problem from the bedroom. These discoveries happen now, or they happen at move-in, when they become regrets instead of adjustments.
This is exactly the walkthrough Tabel Construction conducts on every project. If you are planning a major remodel on the Peninsula and want to understand what this process looks like before you commit to a contractor, we are happy to walk you through it. Call Matt at (408) 448-1342 or reach Margie at info@tabelconstruction.com.
Why Most Builders Skip It
If the pre-drywall walkthrough is so valuable, why do not all builders make it a standard step?
It takes time. A thorough walkthrough pauses the schedule for half a day or more. For a builder measured on speed, that is half a day of "lost productivity", never mind that it prevents weeks of rework later.
It invites questions. Some builders do not want questions at this stage. They want to close the walls, show progress, and keep moving. Questions slow things down. Questions sometimes reveal mistakes. A builder who is not confident in the work behind the walls has every incentive to cover it up as quickly as possible.
It requires confidence. The builder is inviting the homeowner, and possibly the architect, to scrutinize every wire, every pipe, every framing connection. Everything is exposed. If the work is sloppy, this is when it shows. The walkthrough is an act of transparency that only works if the builder has nothing to hide.
Some builders treat the pre-drywall phase as a race to close walls. Drywall going up looks like momentum. Walls become smooth, rooms take shape, and the homeowner feels like things are moving. But speed at this stage can hide problems that will not surface for years: a plumbing connection behind a wall that was not properly supported, electrical work that does not meet code, blocking that was forgotten.
Here is the uncomfortable truth: skipping the walkthrough benefits the builder, not the homeowner. It is faster. It is cheaper. It avoids the risk of a homeowner catching something that needs to be fixed. And it counts on the fact that once the walls are closed, nobody will ever see what is behind them.
A builder who invites you to inspect the work before hiding it is a builder who has nothing to hide.
What to Look For: A Homeowner's Pre-Drywall Checklist
Save this. Bring it to the walkthrough on your phone. Go room by room.
Outlet and switch locations. Check them against your actual daily life, not just the plan. Where will you charge your phone at the bedside? Where is the switch when you walk into the garage with your hands full? Is there an outlet where the Christmas tree goes?
Lighting positions. Especially recessed lights, verify they are centered where you expect. Pendants over the island, confirm the junction boxes are at the right spacing. Vanity lighting, check the height relative to the mirror.
Shower valve height and showerhead placement. Stand in the framed shower. Mime turning on the water. Does the valve height feel natural? Is the showerhead position where you want it, keeping in mind your height and your partner's height?
Blocking locations. Ask your builder to show you where blocking has been installed: TV mount, floating shelves, towel bars, grab bars, heavy mirrors, pot racks, wall-mounted coat hooks. If you are not sure whether you will mount something later, add blocking now anyway. The cost is negligible. The future savings are significant.
Window and door framing. Verify that rough openings are sized correctly for the windows and doors that have been ordered. A mismatch here, discovered after drywall, is an expensive correction.
Insulation plan. Ask about type, R-value, and any sound insulation between rooms. If you want a quiet bedroom next to a media room, this is when that gets specified, not after the walls are closed.
Take photos. Every wall, every room, every run of electrical and plumbing. Front, back, left, right. Your builder should be doing this too. These photos become the permanent record of what is behind your walls, invaluable if you ever need to locate a wire, a pipe, or a stud for future work.
For architects and designers: Verify structural connections match the engineered drawings. Confirm that MEP routing does not conflict with design intent, a duct run through a space intended for a coffered ceiling, a drain line where a recessed niche was planned. Check that any field changes have been documented and approved.
Why Architects and Designers Should Require It
If you are an architect or designer specifying work on Peninsula projects in Hillsborough, Woodside, Portola Valley, or Palo Alto, the pre-drywall walkthrough is your single best opportunity to verify execution fidelity before it becomes invisible.
It catches field deviations early. A misplaced header that conflicts with a cabinet run. A duct routed through a space intended for a ceiling detail. Blocking forgotten for a custom cabinet mount. These deviations happen on every project. The question is whether they are caught at the framing stage, when a fix takes an hour, or discovered during the finish stage, when it takes a week and a difficult conversation with the homeowner.
It protects your reputation. If something is wrong behind the walls and you did not catch it, the client blames both the builder and the designer. The walkthrough is documented proof of professional diligence, a quality checkpoint that shows you were present, you inspected, and you verified. In the tight-knit Peninsula design community, that matters.
It reveals the builder's trade mastery. The pre-drywall walkthrough is where a builder with genuine trade knowledge proves it, not by following the drawings blindly, but by flagging issues the drawings did not anticipate. A framing condition that suggests a different structural approach. A plumbing layout that could be optimized for access and maintenance. A blocking detail the drawings missed. The builder who catches these things and brings them to the architect as solutions is the builder you want on the next project, and the one you will actually refer with confidence.
When a builder says "we stop the project and walk you through everything before we close the walls," that tells the design professional something important about how the rest of the project will be managed: with the same discipline and the same openness to scrutiny.
What Happens If You Skip It
The consequences of skipping the pre-drywall walkthrough are not dramatic. They are slow, quiet, and permanent.
An outlet in the wrong place behind a finished wall. You discover it when the furniture arrives and the cord will not reach. The fix: cut the wall, move the box, repatch, retexture, repaint. Or accept the compromise and run an extension cord behind the dresser for the next 30 years.
A missed blocking location. Your 85-inch TV mount needs four lag bolts into solid wood. There is no wood there, just drywall and air. The fix: a $2,000 drywall repair, or a freestanding TV stand that was never part of the plan. All for a $15 piece of lumber that should have been there from the start.
An HVAC register aimed at the bed. Every night, a cold draft hits at 2 a.m. when the system cycles on. The fix: rerouting ductwork inside a finished ceiling, or buying a magnetic vent deflector and living with the compromise.
The emotional cost is the hardest part. It is the slow, creeping realization months after move-in that things behind the walls were not quite right. That something was missed. That no one stopped to ask whether you were satisfied with what you could not see. And now there is nothing to be done about it without major disruption.
The builder who closed the walls fastest saved three days on the schedule. That speed cost you thousands in post-completion fixes, or a lifetime of small frustrations you learn to live with.
One Question That Tells You Everything
If you are planning a major remodel on the Peninsula, in Hillsborough, Atherton, Burlingame, Menlo Park, Los Altos, Woodside, or Portola Valley, ask every contractor you interview one question:
"Do you do a formal pre-drywall walkthrough?"
The answer tells you how they think about your project. A builder who pauses the entire schedule to walk you through the work before hiding it, who invites scrutiny, welcomes questions, and treats that day as a milestone rather than an inconvenience, is operating with a fundamentally different set of priorities.
"We include what others leave out." The pre-drywall walkthrough is one of those things.
If you are evaluating contractors and want to understand what this process looks like when it is done right, for a project in your community, at your scale, we are happy to walk you through it before you commit to anyone. Reach Matt at (408) 448-1342 or Margie at info@tabelconstruction.com. If you are planning a major remodel on the Peninsula, we are happy to talk through the process with you, even if you end up working with someone else.
Still deciding on a contractor? Read: What to Look For When Hiring a General Contractor for a Major Remodel, and add the pre-drywall walkthrough to your vetting checklist.
Want to understand the bid process first? Start with: How to Compare Contractor Bids Without Getting Burned, it explains what a transparent bid includes and what low-ball bids leave out.
FAQ: Pre-Drywall Walkthroughs on Peninsula Remodels
Q: What is a pre-drywall walkthrough and when does it happen during a remodel?
A pre-drywall walkthrough is a formal inspection conducted after framing, rough electrical, rough plumbing, and HVAC rough-in are complete, but before insulation and drywall are installed. It is the single window in the construction process when every system behind the walls is visible, accessible, and correctable without major disruption. On a typical Peninsula remodel, this happens roughly two to four months after demolition, depending on the scope and permit timeline.
Q: What is checked during a pre-drywall walkthrough?
A thorough pre-drywall walkthrough covers: outlet and switch locations (verified against how you actually use the space), plumbing supply and drain routing for every fixture, HVAC ductwork routing and register placement, structural framing connections and engineered details, blocking and backing for all future wall-mounted items (TVs, shelves, towel bars, grab bars), window and door rough opening sizing, and insulation specifications for acoustics and thermal performance. The homeowner should also take photos of every wall for future reference.
Q: How much does it cost to move an electrical outlet after drywall is installed?
On a Peninsula remodel in 2026, moving a single electrical outlet after drywall is installed typically costs $500 to $2,000 depending on the wall surface, finish type, and whether the circuit needs to be extended. The same change before drywall costs an electrician 20 minutes and a few feet of wire, often covered within the original contract. The pre-drywall walkthrough is the last opportunity to make these changes at minimal cost.
Q: Do all general contractors offer a pre-drywall walkthrough?
No. Many contractors rush this phase because closing walls creates visible progress and keeps the schedule moving. A builder who proactively schedules the pre-drywall walkthrough as a formal milestone, pausing the crew for two to four hours to walk the homeowner through every system, is operating with a different set of priorities than one who closes the walls as quickly as possible. When interviewing contractors, ask specifically: "Do you conduct a formal pre-drywall walkthrough, and is it part of your standard process or something we request separately?"
Q: How does a pre-drywall walkthrough protect the architect's design intent?
The pre-drywall walkthrough gives the architect the opportunity to verify that field execution matches the drawings before everything becomes invisible. Common deviations caught during this phase: ductwork routed through spaces intended for architectural features, blocking missing for custom cabinet mounts, MEP routing conflicting with designed ceiling treatments, or structural connections that differ from engineered specifications. Catching these at the framing stage takes hours to correct. Catching them after drywall takes weeks, and a difficult conversation with the client.
Q: What makes the Tabel Construction pre-drywall walkthrough different from what other contractors offer?
Tabel's pre-drywall walkthrough is a scheduled milestone, not an optional visit. Matt Tabel, who has been building on the Peninsula for 20+ years as a third-generation builder with full trade mastery, conducts the walkthrough personally. The crew pauses, the homeowner and their architect or designer walk every room, and nothing gets approved for close-up until all questions are answered. Matt calls it "last call for wires in the walls." It is also where a builder with hands-on trade knowledge catches things the drawings did not anticipate: a structural detail that needs refinement, a blocking opportunity that was not specified, a plumbing routing option that will simplify future maintenance. That combination of process discipline and trade expertise is what makes the walkthrough a genuine quality checkpoint rather than a formality.